fbpx

What is scrapbooking?

Scrapbooking, or photo journaling, is simply a word for how you preserve and then display your photos, memories and family history in an album.

The importance of the activity is preserving YOUR story and the story of those you hold dear!  That’s it.

The secret is to document your life, your fun, your story in your way. There are several ways to do this. 

      • Digital Albums or Photo Book – is typically created online, but there are programs to create them on the computer.
        •  An example of this can be found at Shutterfly.com. Once you create an account you are rewarded with free prints! You can also upload your photos, place them where you want them and purchase the Photo Book. They print the pages and bind the book for you. Want to try it out?
      • Scrapbook – Typically in a purchased photo album with photos, journaling (the written out story behind the photos) and maybe some embellishments (anything added to the page other than the story and the photos).
          • Pocket Albums are an easy to use solution where you simply slide the photo into the available pocket and write out the details of the event for another pocket. 
          • Magnetic albums are albums with sticky pages that the user could stick the photos right on the page. As I mentioned in the Introduction To Scrapbooking post, I do not recommend this type of album.
          • Scrapbooks – these can be found onine or at your favorite crafting store. They will be in the scrapbook section and usually come with pages inside of a see through cover. 

I still love the feel and creativity of physical albums.  However, I can appreciate the easy of creating a Photo Book online and having it printed!

Purchase your album or digital software.

NOTE: The rest of this article will be about putting photos in albums. Follow the instructions in the software or online program for digital photo book creation.

Selecting Photos

How many photos do you need for your page? Do you need a whole album? Is it important to use all of the photos available? These are all great questions and I hear them frequently!

Typically you can plan on using 2 to 9 photos for a two page layout (left and right side).

    • When there are a lot of photos (for example a family reunion or a very long vacation) you might want to fill up one album for that event.
    • If you have 10 or so photos then you would just want to do a two page layout in the album.
    • Typically you can plan on using 2 to 9 photos for a two page layout (left and right side).


Look through the photos you have available and pick out the ones that best showcase the event and people.  

Feel free to discard the ones that are blurry, the subject isn’t clear or is so small that it’s hard to see. To see good examples of this, be sure to visit  Introduction To Scrapbooking  as it has examples of each.

A great way to approach scrapbooking is one 2-page layout at a time. Sketches, or templates, are a fun and easy way to create layouts!  

Examples of a 2-Page Layout

2 Page Layout (left and right page)
Scrapbooking Layout - Fishing, Ocean, Aquatic
Page Tammey Brown

Pick your paper

Pick your paper to match your photos/event

    • For example, in the layout above right, the photos have a lot of blue so the creator used blue shades in the paper behind the photos. A great contrast to blue is orange as you can see in the second example that I created using this same sketch. A sketch is a map or template showing where to place elements on the page.

Remember, a picture is worth 1,000 words! 

Look through all of the photos and determine which ones to use. You DO NOT have to use them all. Remember, a picture is worth 1,000 words! If you can’t see grandma’s face, how will anyone else ever know who it is? If that picture of little Sally finding the egg in the grass is almost just like the other pic of her finding an egg, pick the best one and use that.

I love to use what is called color blocking. I cut a piece of cardstock or pattern paper 1/4″ larger than my photo and adhere (stick) the photo to the paper. To do this be sure to use a double sided adhesive. I do not recommend glue or a glue stick. Glue tends to warp or wrinkle the photo and paper and glue sticks don’t seem to hold.

Now I place the framed photos on my background paper until I like the arrangement. I add a border and title, The next piece is the most important.

I write out the story behind the photos. Be sure to include who, what, when, where and why. You will remember possibly for years, the answers to these questions, but others won’t know them. Pretend you are writing to the future. Tell them about the event and the people.

A few hints:

  • Don’t cut your photos into odd shapes when you are beginning. I’ve been teaching scrapbooking for 20 years and I ask over and over people’s greatest regret. It’s always that they cut their photos too small or into odd shapes
  • The second regret is that they used too many stickers or embellishments (decorations) on the pages.
  • The third one – and actually it’s probably even with #1 – is that they wish they would have written more with the photos. More story, more information and more of their own handwriting!
How much would you love to have your grandmother or even great-great grandmothers diary? That’s how much future generations would love to see yours.
 
There you go. Stick the photos and title to your page. Add the journaling (what you write about the photos) and you are done! If you want you can add an embellishment or two to jazz it up a little.
 
CONGRATULATIONS!
 

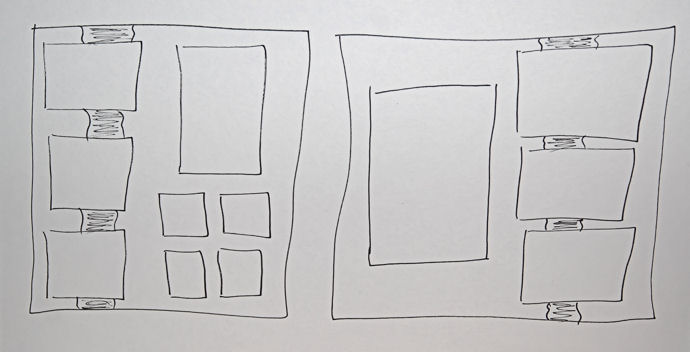
If you have any questions or suggestions, please feel free to reach out to me. I’ve included a very simple sketch below as inspiration. The squares and rectangles are where you might put a photo or you could use one of the spaces to journal (or write about) your photos. If you don’t have smaller photos you could use the smaller spaces for embellishments or for notes.The darkened bar down the left and right side is simply a 2″ wide piece of decorative paper as decoration.